I still remember my first Halloween in the U.S. everything felt so new, and I longed for familiar comforts. I wasn’t a natural cook, but I discovered joy in simple recipes. Creating easy, festive treats for my family became a tradition I cherished. This Halloween Crack brings all that warmth and happiness to my kitchen, making holidays stress-free.
Table of Contents
Why You’ll Love This Halloween Crack Recipe
This isn’t just another treat; it’s a game-changer for your spooky Halloween meals. You’ll find yourself reaching for this recipe year after year, especially if you’re a busy adult looking for kitchen wins.
- Lightning-Fast Prep: This recipe comes together in minutes, letting you spend less time in the kitchen and more time enjoying the spooky festivities.
- Endlessly Customizable: From classic candy corn to playful eye candies, you can tailor the toppings to fit any theme or simply use whatever you have on hand.
- Irresistibly Addictive: The perfect balance of salty and sweet creates a snack that’s impossible to resist, making it a guaranteed crowd-pleaser at any Halloween gathering.
- Minimal Cleanup: With parchment paper doing most of the heavy lifting, cleaning up after your baking adventure is a breeze.
What is Halloween Crack?
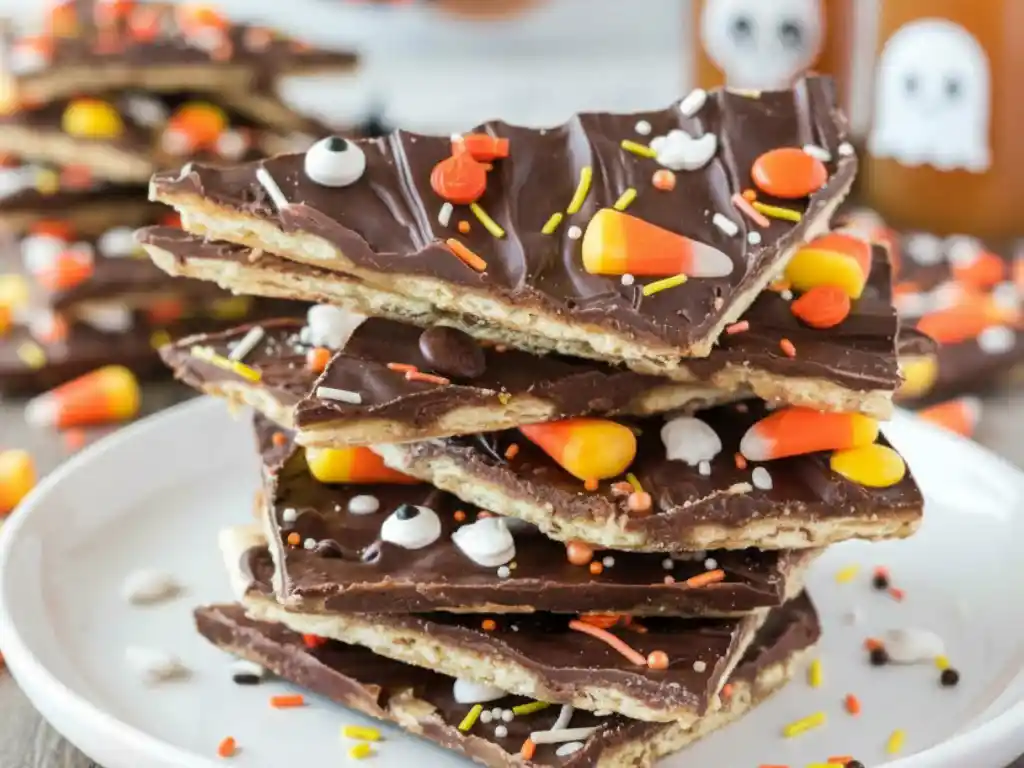
Halloween Crack is a delightfully easy, highly addictive candy that starts with a humble base of saltine crackers. These crackers are topped with a rich, buttery toffee made from vegetable shortening and brown sugar, then baked until golden. Once out of the oven, it’s covered in melted chocolate chips and generously decorated with festive Halloween candies and sprinkles. The magic lies in its perfect salty-sweet crunch, making it a favorite for all ages.
Ingredients for the Best Halloween Crack
Gathering your ingredients is the first step to this delicious Halloween treat. Here’s exactly what you’ll need:
- 35 saltine crackers (around one sleeve)
- 1 cup vegetable shortening
- 1 cup brown sugar
- 10 oz bag of semi sweet chocolate chips
- Eye candies
- Candy corn
- Reese’s pieces
- Halloween sprinkles
Equipment You’ll Need
Having the right tools makes all the difference for a smooth cooking experience. Here’s what you’ll need for your Halloween Crack:
- Baking Sheet: An aluminum baking sheet is excellent for even heat distribution. If you use a non-stick sheet, just be mindful of potential hot spots.
- Parchment Paper: This is essential! Parchment paper prevents sticking and makes cleanup incredibly easy. Avoid foil, as the toffee can stick more readily.
- Saucepan: A heavy-bottomed saucepan is best for melting the shortening and sugar, as it helps prevent scorching and ensures an even boil.
- Rubber Spatula: You’ll use this for spreading the toffee mixture and the melted chocolate evenly.
How to Make Halloween Crack: Step-by-Step Instructions
Ready to create this irresistible Halloween treat? Follow these simple steps for perfect Halloween Crack every time.
- Preheat oven to 350 degrees. Get your oven ready for baking.
- Line a baking sheet with parchment paper and line the saltines up in rows. This ensures easy removal and cleanup. (Visual Cue: Image of a baking sheet lined with parchment paper, with saltine crackers neatly arranged in rows)
- Melt the vegetable shortening and brown sugar in a saucepan and bring to a boil. Stir constantly to combine the ingredients.
- Boil 2-3 minutes stirring constantly, until thick. Keep stirring to prevent burning and achieve the right toffee consistency. (Visual Cue: Image of the mixture boiling and thickening in a saucepan)
- Pour the vegetable shortening/brown sugar mixture over the saltines and spread with a rubber spatula. Ensure an even layer over all the crackers.
- Bake at 350 degrees for 4-5 minutes, until browned and bubbly. Watch closely to prevent burning. (Visual Cue: Image of the crackers covered in bubbly, golden toffee after baking)
- Remove from the oven and sprinkle with the chocolate chips. Distribute the chocolate evenly while the toffee is still hot.
- Let the chocolate chips sit for 5 minutes, then spread with a rubber spatula evenly across the saltines. The residual heat will melt the chocolate, making it easy to spread. (Visual Cue: Image of melted chocolate being spread smoothly over the toffee-covered crackers)
- Top the halloween crack with whatever you want! We used eye candies, halloween sprinkles, reese’s pieces, and candy corns. Get creative and decorate while the chocolate is still soft. (Visual Cue: Image of the Halloween Crack covered in various colorful Halloween toppings)
- Place in fridge until chocolate is hardened, or at least 1-2 hours. Chilling helps the chocolate set quickly for easy breaking.
- Break into pieces and serve. Once firm, simply snap the candy into your desired serving sizes. Store any leftovers in a ziploc bag in the freezer.

Themed Halloween Crack Topping Ideas
While eye candies and candy corn are classic, let’s get creative with some fun themed topping ideas for your sweet Halloween snacks!
- Pumpkin Patch: Combine mini pumpkin candies, a sprinkle of pumpkin spice, and orange and green sprinkles for a festive autumnal feel.
- Monster Mash: Use various sizes of candy eyeballs, green and purple sprinkles, and perhaps a few gummy worms or mini pretzel twists for “monster limbs.”
- Spooky Sprinkle Extravaganza: Go all out with a mix of different Halloween-themed sprinkles: bats, ghosts, skulls, and classic orange and black jimmies.
- Ghostly White: Use white chocolate chips instead of semi-sweet, then top with white sprinkles and tiny ghost-shaped candies for an ethereal look.
- Witches Brew: Mix green, purple, and black sprinkles with a few gummy frogs or sour candies for a bubbling cauldron effect.
Halloween Crack Variations and Substitutions
Want to customize your Halloween Crack or cater to different dietary needs? Here are some great variations and substitutions you can try:
| Variation/Substitution | Ingredient Change | Flavor/Texture Impact | Notes |
|---|---|---|---|
| Vegan | Vegan butter, dairy-free chocolate chips | Rich, dairy-free toffee and chocolate | Ensure all toppings are also vegan. |
| Gluten-Free | Gluten-free crackers | Maintains salty crunch, safe for gluten-sensitive | Check cracker label carefully for certified gluten-free. |
| Honey/Maple Toffee | 1 cup honey or maple syrup | Deeper, more complex sweetness, slightly less crisp | May require slightly longer boil time to reach proper toffee consistency. |
| Ritz Crackers | Ritz crackers | More buttery, slightly richer salty base | A good alternative if you prefer a buttery flavor. |
| Club Crackers | Club crackers | Mildly buttery, slightly sweeter than saltines | Offers a subtle flavor variation. |
| Dark Chocolate | Dark chocolate chips | More intense chocolate flavor, less sweet | Balances the sweetness of the toffee well. |
Make-Ahead Instructions for Halloween Crack
Halloween is busy enough, so any make-ahead tips are a lifesaver! Here’s how you can prep your Halloween Crack in advance:
The beauty of Halloween Crack is that it’s designed to be made ahead. You can prepare the entire recipe, from start to finish, up to a week in advance. Simply follow all the steps, let it harden completely, and then store it as instructed. The toppings hold up well, and the toffee maintains its crispness.
How to Store Halloween Crack
Proper storage keeps your Halloween Crack fresh and delicious for longer!
Once your Halloween Crack has fully hardened, break it into pieces and store it in an airtight container at room temperature for up to 3-4 days. For longer storage, you can keep it in the refrigerator for up to 1-2 weeks. It also freezes beautifully! Place the pieces in a freezer-safe ziploc bag or airtight container, and it will last for up to 2-3 months. Just let it thaw for a few minutes before serving.
Troubleshooting Your Halloween Crack
Even the simplest recipes can sometimes throw a curveball. Here are solutions to common Halloween Crack mishaps:
- “Why is my toffee burnt?” This usually happens if the sugar mixture boils for too long or isn’t stirred constantly. Make sure to keep stirring during the 2-3 minute boil time and remove it from heat once it’s thick and bubbly, not dark brown. (Visual Cue: Image showing slightly burnt vs. perfectly golden toffee layer)
- “Why isn’t my chocolate melting evenly?” If your chocolate chips aren’t melting smoothly, the toffee might have cooled too much. Ensure you sprinkle the chips immediately after removing the pan from the oven. If needed, you can pop the pan back into the warm, off-oven for a minute or two to help the chocolate melt, then spread quickly.
- “Why is my crack candy too hard to break?” This could mean the toffee boiled for too long and became overly hard. Next time, aim for a 2-3 minute boil until it’s just thick. If it’s too hard, try letting it warm up slightly at room temperature, which can make it easier to break, or use a sharp, heavy knife.
Serving Suggestions for Halloween Crack
While breaking your Halloween Crack into pieces and serving it as is is always a hit, here are some creative ways to enjoy this festive treat:
- Halloween Dessert Board: Arrange pieces of Halloween Crack alongside other spooky pizza-stuffed pumpkins like gummy worms, mini cookies, and chocolate-dipped pretzels for an impressive spread.
- Ice Cream Topping: Crumble pieces of Halloween Crack over a scoop of vanilla or chocolate ice cream for an extra layer of crunch and flavor.
- Party Favors: Package smaller portions of Halloween Crack in cute cello bags tied with festive ribbons for a sweet take-home treat for guests.
- Edible Gift: Wrap a batch in decorative paper or a themed tin as a homemade gift for friends, teachers, or neighbors.
Irresistibly Addictive Halloween Crack
Ingredients
Equipment
Method
- Preheat oven to 350 degrees. Get your oven ready for baking.
- Line a baking sheet with parchment paper and line the saltines up in rows. This ensures easy removal and cleanup.
- Melt the vegetable shortening and brown sugar in a saucepan and bring to a boil.
- Stir constantly to combine the ingredients.
- Boil 2-3 minutes stirring constantly, until thick. Keep stirring to prevent burning and achieve the right toffee consistency.
- Pour the vegetable shortening/brown sugar mixture over the saltines and spread with a rubber spatula. Ensure an even layer over all the crackers.
- Bake at 350 degrees for 4-5 minutes, until browned and bubbly. Watch closely to prevent burning.
- Remove from the oven and sprinkle with the chocolate chips. Distribute the chocolate evenly while the toffee is still hot.
- Let the chocolate chips sit for 5 minutes, then spread with a rubber spatula evenly across the saltines. The residual heat will melt the chocolate, making it easy to spread.
- Top the halloween crack with whatever you want! We used eye candies, halloween sprinkles, reese’s pieces, and candy corns. Get creative and decorate while the chocolate is still soft.
- Place in fridge until chocolate is hardened, or at least 1-2 hours. Chilling helps the chocolate set quickly for easy breaking.
- Break into pieces and serve. Once firm, simply snap the candy into your desired serving sizes. Store any leftovers in a ziploc bag in the freezer.
Notes
Frequently Asked Questions
Have questions about making Halloween Crack? I have answers!
Can I use butter instead of vegetable shortening for the toffee?
Yes, you can use butter. However, vegetable shortening creates a slightly different texture in the toffee, often making it a bit crispier. If using butter, use the same 1 cup quantity.
Do I really need parchment paper?
Absolutely! Parchment paper is crucial. It prevents the toffee from sticking to the baking sheet and makes cleanup incredibly easy. Without it, you’ll have a very sticky mess.
How do I know when the toffee is thick enough?
After boiling for 2-3 minutes while stirring constantly, the mixture will visibly thicken and coat the back of your spoon. It should have a syrupy consistency, not watery.
My chocolate isn’t spreading smoothly; what should I do?
If the chocolate isn’t spreading, the toffee might have cooled too much. You can try returning the baking sheet to the warm, off-oven for just a minute or two to soften the chocolate, then spread quickly.
Can I use different types of chocolate chips?
Yes, feel free to experiment! Milk chocolate, dark chocolate, or even white chocolate chips work wonderfully. Adjust your topping choices to complement the chocolate flavor.
Conclusion
Making Halloween Crack is truly one of my favorite ways to bring some simple, spooky fun into the kitchen. It’s comforting, easy, and always a huge hit, proving that delicious doesn’t have to mean complicated. I love how quickly it comes together and how customizable it is, making it perfect for any busy adult who wants a stress-free win.
So go ahead, whip up a batch of this irresistible Halloween treat. I promise you’ll feel confident and joyful creating something everyone will adore. I would love to hear how your Halloween Crack turns out! Please leave a comment below, ask any questions, or share your fantastic topping combinations. Let’s make this Halloween delicious and effortless together!


